Search This Blog

Showing posts with label Breaking Bread. Show all posts

Waffles


I don't need to tell you how good waffles are. They are the perfect vehicle for cream, honey, syrup, berries or chocolate. Or you can go the savoury way with gravy, chicken or cheese. Either way, waffles are amazing.

Waffle batter is pretty similar to that of pancakes but there is one prominent distinction - butter. Not that pancakes dont call for butter, but waffles always call for a fair amount of butter. Butter is what gives waffles its crisp light texture and ensure that it releases easily for the waffle iron. The more butter in the batter (sounds like a tongue twister no?), the richer, crispier the waffle. For lactose intolerant peeps, you can substitute 3tbsp vegetable oil for evey 4tbsp butter.


Makes approx. 8 waffles

2cups flour
1tsb baking powder
1tbsp castor sugar*
1/2tsp salt
3 eggs
1 1/2 cup milk
1 cup melted butter**

*Since I was going to top my waffles with whipped cream and strawberry compote, I went a little low on the sugar in the waffle batter. 1tbsp sugar is also perfect for making savoury waffles. If you will be eating the waffles as is, add in another tbsp of sugar

** Use 4tbsp of butter for a 'low calorie' waffle, 8 tbsp (or 1 stick) for a classic fluffy waffle or 200gms for the crunchiest waffles ever

In a large bowl mix all your dry ingredients i.e: flour, baking powder, sugar and salt. In another bowl, mix in the wet ingredients i.e: eggs, butter and milk. Ensure that your melted butter is not hot while mixing it with eggs. Make a well in the centre of the dry ingredients and pour in the wet ingredients. Whisk to combine.

Heat the waffle iron until your indicator shows its ready. Ladle on the waffle batter, enough to cover around 2/3rd of the grid surface. Close the lid. My waffle maker takes 7-10mins to make a batch of waffles. Cooking time will depend on individual waffle makers. A waffle is ready when steam stops emerging from the cracks of the iron. If you lift the top and the waffle shows resistance, it means that the waffle is still not done.


Waffles can be kept warm in an oven on low heat. This will also help retain its crispiness until you are ready to serve. Leftovers can be refrigerated for 2-3days or frozen for several months.

I served mine in two batches: one with strawberry compote and whipped cream, and the other with some irish cream and whipped cream. Yummy in my tummy!


Tip: you can separate the eggs and beat the whites separately and incorporate for a lighter, fluffier waffle


Focaccia Bread


I first tried focaccia bread at Theobroma. This was at a time when I didn't even know how to pronounce focaccia (it's foe-kat-cha fyi). And it was love at first bite. I always buy some focaccia to bring back home. My family relishes it. It's such a rustic bread and topped with such delicious things that it's like eating a pizza. Basic focaccia dough requires just 5 ingredients - olive oil, flour, water, yeast and salt. The beauty of this dough is in its simplicity, which is why it lends itself to so many variations. Once you have mastered the dough, your toppings are endless. And it's the perfect option for novice bread makers as its easy to prepare and doesn't require any fancy kneading or shaping techniques.


For my focaccia, I've  divided the dough to make two loaves - one with garlic, rosemary, thyme and oregano; and another with garlic and olives.


Adapted from The Joy Of Cooking

1 1/3 cups of warm water
2 1/4 tsp of active yeast (if using dry yeast double the quantity)
3 1/2 cups of all purpose flour
Olive oil*
2 tsp salt

*I estimate atleast 2 cups of olive oil. This dough uses a lot of olive oil as you will read below, so really use your own instinct while using olive oil, more the better!

Suggested toppings:
Dried herbs like Thyme, oregano, rosemary, basil or dill
Olives
Tomatoes
Onions
Cheese


Combine the warm water and yeast in a large bowl and let it stand for 5 odd minutes until the yeast is dissolved.

Add the rest of the ingredients (approx 2 tablespoons of the olive oil right now), minus the toppings, and mix for a minute. Now knead for 7-10mins until the dough has come together and is smooth and elastic. Transfer the dough to a bowl lightly coated with olive oil and turn it so as to even coat the dough with oil.

Cover with cling film and keep in a warm place for 60-90mins to let it rise. Pssst....this dough is actually now a pizza dough. You can actually punch down the dough, let it rest and then add your favourite toppings to make pizza. I'm digressing...pizzas is for another day and a different blog post.

After the first rise, divide the dough in half and roll each piece out to a 1/2 inch thick round (this isn't necessary, I did it as I was making two variations). Transfer to well olive oiled baking pans. Cover with oiled plastic wrap for 1 1/2 hours to let it rise again.

Preheat the oven to 200 degrees celsius. Remove the cling wrap before baking. Press the dough with your fingertips to make indentations all over. While this step includes getting your hands dirty, don't skip it. Not only does it make the bread look good, dotting the bread creates multiple wells which help preserve moisture in the bread. Drizzle 1/2 cup of olive oil over the dough and add your desired toppings.

Bake for approx 25 mins or until the bread is golden brown. Serve warm as is or as sandwich bread at room temperature.


The trick to making good focaccia is to ensure you create a lot of dimples into the dough with your fingertips. And then drizzle enough olive oil into those dimples. These crevices absorb the oil while the focaccia bakes creating a bread with a beautiful crust with a tender interior (see below).


Cinnamon Rolls & more

Sugar. Spice. And everything nice. These were the ingredients chosen to create the perfect little roll. My kitchen this week was transformed into the best smelling place on earth. Imagine the smell of warm freshly baked bread, fresh ground cinnamon and melting butter - it's probably what the evil witch used to lure Hansel and Gretel. Yep, sweet dreams are made of these.

And they taste as good as they smell. I'm guessing most people don't attempt making these at home thinking that they are just too much work and too time consuming. Well, think again. This dough is as easy to make as cake batter. Actually, minus the yeast, it practically is cake batter - flour, sugar, milk, butter, eggs.

I truly believed I had self control until I made these. It is just too irresistible and hence perfect to serve for breakfast on Christmas day. Just wait till you smell them baking,  it's probably what Santa's factory smells of. I want to bottle this scent and wear it forever!


Adapted from Epicurious.com

For the dough:

1 cup milk
3 tbsp unsalted butter
3 1/2 cups (plus more for rolling and dusting) all purpose flour
1/2 cup sugar
1 large egg
3tsp active dry yeast (if using the powder form double this quantity)
A pinch of salt

For the filling:

3/4 cup brown sugar
2 tbsp ground cinnamon
1/4 cup melted butter

For the glaze:

1 cup cream cheese
1tbsp milk or fresh cream
2 cup powdered sugar
1/4 cup melted butter
1 tsp vanilla essence
2 tbsp Amarula or any other liquor (optional)

Combine milk and butter in a bowl and microwave until the butter melts. The mixture should be warm and not piping hot. Pour into a large bowl. Add 1 cup flour, sugar, egg yeast and salt. Using your hands or a stand mixer stir to combine. Add the rest of the flour and mix till the flour is incorporated. The dough should be sticky but should also pull away from the sides of the bowl.

Lightly flour your kitchen work surface. Turn the dough out and knead until smooth and elastic. Add some more flour if the dough is too sticky. After kneading for about 5-8mins the dough should come together to form a smooth ball. Lightly oil a large bowl and transfer the dough, turning it to coat. Cover the bowl with cling film or a kitchen towel. Let it rise for approx 2 hours or until the dough is double in volume.

Punch down the dough gently with your knuckles. Transfer again to floured work surface. Roll the dough out to form a large rectangle. You can also cut out the dough to give the desired shape.


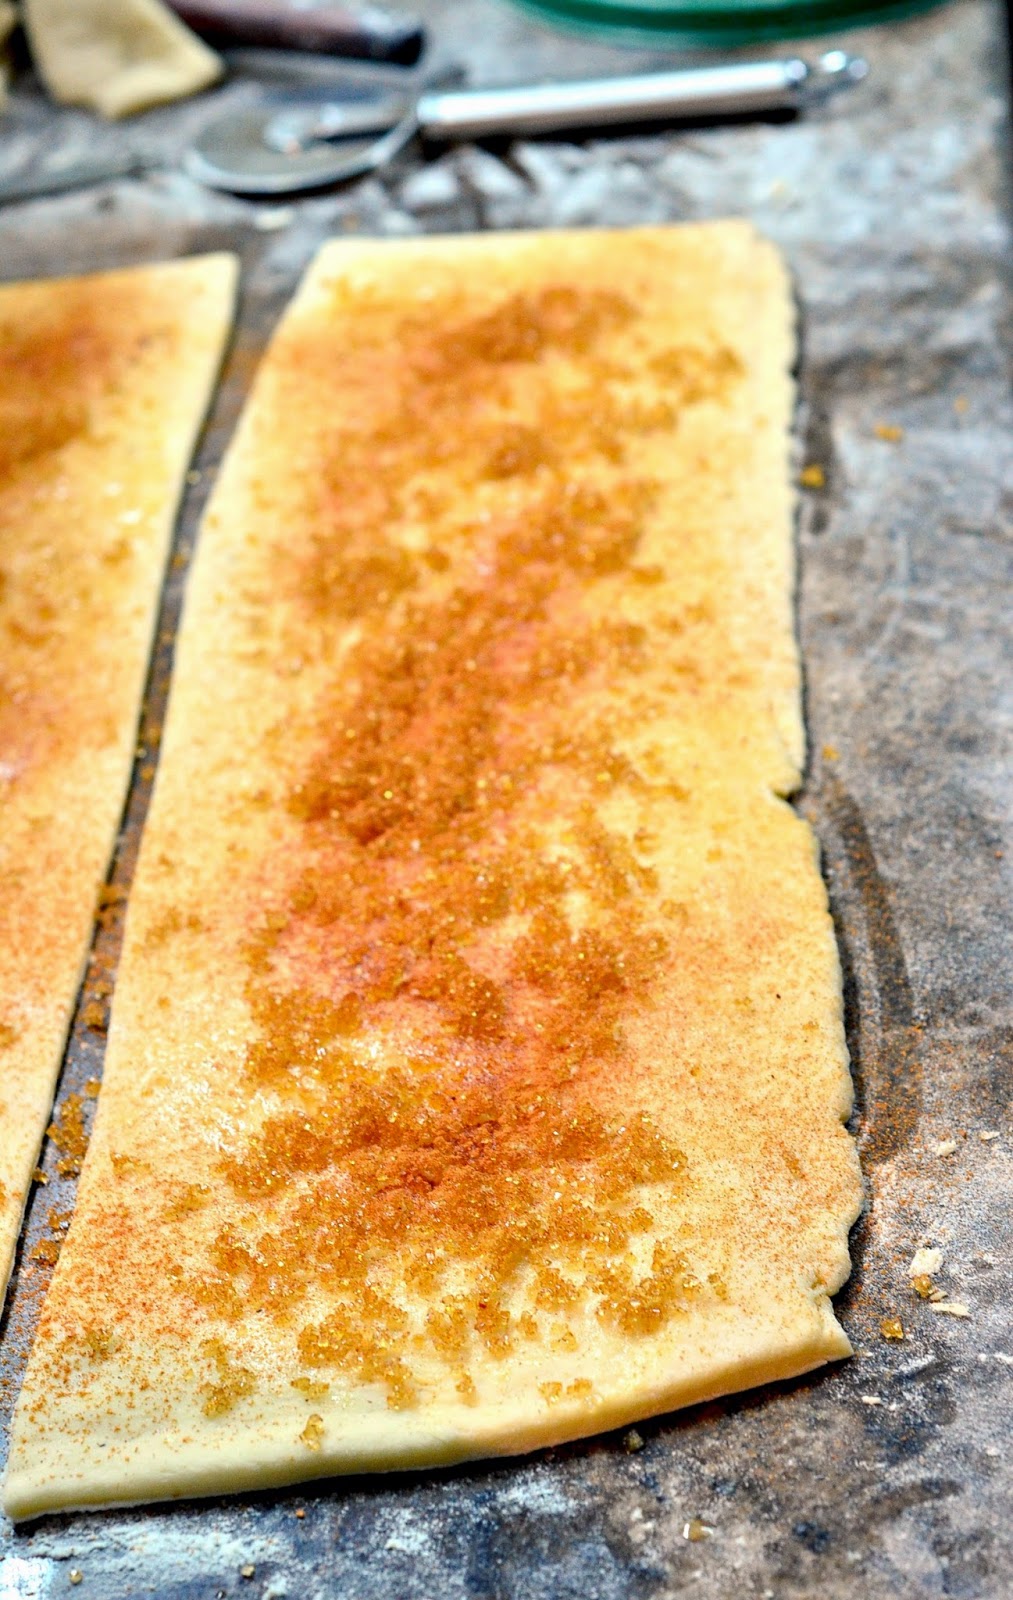
Now for the filling: spread butter over the dough. Mix brown sugar and cinnamon in a bowl. Sprinkle this cinnamon sugar evenly over the butter. Ensure that you leave 1/2 inch border. Roll the dough into a log. You can pinch it gently to keep it rolled up. with seam side down, cut the dough into 1/2inch to 1inch sized slices.


Grease your baking dish and arrange rolls cut side up. It is ok if there is barely any space between rolls. Cover the baking dish with cling film or a kitchen towel and let the dough rise again for 4-50mins.


Preheat the oven to 200°C. Bake rolls for approx 20 mins or until the tops are golden.


Remove from the oven and invert immediately onto a rack to cool. Once cooled, turn the rolls right side up.


For the glaze, beat all ingredients together until smooth. Drizzle on top of the rolls. Serve warm or at room temperature.


The best part is that I had a lot of trimmings left by cutting the dough to a rectangle. So I got to experiment with different fillings. Pictured here is a giant roll stuffed with some cherry jam that I had in my pantry.


Besides the classic cinnamon filling, I recommend trying chocolate chips, dessicated coconut, nuts, caramel or even fresh fruits.


FYI: Butter, eggs, milk and sugar slow down yeast activity. Regular bread rises quickly but since this roll involves all of the above, the bread may rise more slowly or not quite as much as usual. There is nothing wrong with the yeast or the bread, it's just that for recipes as rich as these, you just need patience :)