Search This Blog

Showing posts with label Italian. Show all posts

Focaccia Bread


I first tried focaccia bread at Theobroma. This was at a time when I didn't even know how to pronounce focaccia (it's foe-kat-cha fyi). And it was love at first bite. I always buy some focaccia to bring back home. My family relishes it. It's such a rustic bread and topped with such delicious things that it's like eating a pizza. Basic focaccia dough requires just 5 ingredients - olive oil, flour, water, yeast and salt. The beauty of this dough is in its simplicity, which is why it lends itself to so many variations. Once you have mastered the dough, your toppings are endless. And it's the perfect option for novice bread makers as its easy to prepare and doesn't require any fancy kneading or shaping techniques.


For my focaccia, I've  divided the dough to make two loaves - one with garlic, rosemary, thyme and oregano; and another with garlic and olives.


Adapted from The Joy Of Cooking

1 1/3 cups of warm water
2 1/4 tsp of active yeast (if using dry yeast double the quantity)
3 1/2 cups of all purpose flour
Olive oil*
2 tsp salt

*I estimate atleast 2 cups of olive oil. This dough uses a lot of olive oil as you will read below, so really use your own instinct while using olive oil, more the better!

Suggested toppings:
Dried herbs like Thyme, oregano, rosemary, basil or dill
Olives
Tomatoes
Onions
Cheese


Combine the warm water and yeast in a large bowl and let it stand for 5 odd minutes until the yeast is dissolved.

Add the rest of the ingredients (approx 2 tablespoons of the olive oil right now), minus the toppings, and mix for a minute. Now knead for 7-10mins until the dough has come together and is smooth and elastic. Transfer the dough to a bowl lightly coated with olive oil and turn it so as to even coat the dough with oil.

Cover with cling film and keep in a warm place for 60-90mins to let it rise. Pssst....this dough is actually now a pizza dough. You can actually punch down the dough, let it rest and then add your favourite toppings to make pizza. I'm digressing...pizzas is for another day and a different blog post.

After the first rise, divide the dough in half and roll each piece out to a 1/2 inch thick round (this isn't necessary, I did it as I was making two variations). Transfer to well olive oiled baking pans. Cover with oiled plastic wrap for 1 1/2 hours to let it rise again.

Preheat the oven to 200 degrees celsius. Remove the cling wrap before baking. Press the dough with your fingertips to make indentations all over. While this step includes getting your hands dirty, don't skip it. Not only does it make the bread look good, dotting the bread creates multiple wells which help preserve moisture in the bread. Drizzle 1/2 cup of olive oil over the dough and add your desired toppings.

Bake for approx 25 mins or until the bread is golden brown. Serve warm as is or as sandwich bread at room temperature.


The trick to making good focaccia is to ensure you create a lot of dimples into the dough with your fingertips. And then drizzle enough olive oil into those dimples. These crevices absorb the oil while the focaccia bakes creating a bread with a beautiful crust with a tender interior (see below).


Tiramisu


For those not in the know, Tiramisu is an Italian, coffee flavoured dessert. It is made from ladyfingers (not to be confused with okra or bhindi) dipped in coffee, layered with a whipped mixture of egg yolks, sugar & mascarpone (pronounced mah-scar-pone-nay) cheese.


It is one of my all time favourite desserts, I think slowly and steadily its over taking cheesecake to the number 1 slot. I judge restaurants and patisseries based on the tiramisu they make. When made right, there is nothing more orgasmic in your mouth than a tiramisu.


This dessert has been on my cooklist for months. Unfortunately, its ingredients were pretty expensive and not easy to come by. The main pillars of this dessert are macarpone cheese and ladyfingers. On my last trip to Goa, I stumbled upon ladyfingers at Newtons, and immediately snatched it up. Now all I needed was marscapone cheese and I was sorted with the basics.

Mascarpone cheese is an Italian cheese that is thick and soft and has a high fat content. This richness is essential to the tiramisu, and you can also use this cheese for cheesecakes or pasta sauce. Its easily available at Nature's Basket outlets, however, its so expensive (700 bucks for 250gms). That is, until I discovered a cheaper, Indian made brand. If you are trying out this dish, please buy La Cremella Mascarpone Cheese (also available at Nature's Basket). It cost 200 odd bucks for a quart. If it still seems expensive, you can try to make it at home.


P.S: This dessert couldn't have come to fruition without the help of my Sous Chef husband, so major credit goes to you Shrey Kamerkar.

500gms Mascarpone cheese
3 egg yolks
100gms Sugar
250ml Whipping cream
1 pack or approx 25-30 ladyfingers
1 cup brewed, lukewarm espresso (any black coffee with two teaspoon sugar)
1 cup Kahlua (optional)
Cocoa Powder to sprinkle on top

In a stand mixer, whip the whipping cream till double its volume. If you don't have a stand mixer, you can use the hand mixer or even whisk with your hands, however please note that it will take more time and energy. Now add the cheese and whisk for just one minute. It is crucial that you don't over whisk at this time as the cream might start to curdle. Once combined, set aside.

In a bowl add the egg yolks and sugar and whisk. Once fairly combined, place the bowl in a double boiler. Keep whisking while alternating the bowl on the heat and away from the heat. It is important to do this step carefully as prolonged exposure to the heat will cause the egg to scramble. Use your judgement, but for those who can't take a call, rule of thumb is for every minute you whisk the egg on the double boiler, whisk it for 3 mins away from the gas. Use mitts as you will be touching a hot bowl and going in and out of gas range. I know it sounds complicated, but this process is important to eliminate the risk involved in using raw eggs. Whisking the eggs and sugar will need a lot of elbow grease. The sugar must completely dissolve in the egg. You are looking for a sabayon consistency i.e: the egg will turn pale yellow and when you lift the whisk into the air, the mixture will fall back into the bowl in ribbons.

Now gently fold the egg mixture into the cream & cheese mixture and set aside. In another bowl, mix together the espresso and Kahlua. To build the tiramisu, quickly dunk the ladyfinger into the coffee liquid. It needs to be a quick dunk so as to not get it too soggy. Lay them side by side on the bottom of the serving bowl. Spoon a layer of the mascarpone mixture to evenly over the bowl. Repeat with another layer of ladyfinger and finally with another layer of mascarpone. Use a spatula or a butter knife to smoothen out the top layer and make it even.


Refrigeratefor atleast an hour before serving. Just before serving, sift a light, even dusting or cocoa powder over the top.


Note: The traditional recipe calls for only mascarpone cheese, but I've used a half & half mix of the cheese & whipped cream, solely so that it doesn't pinch my wallet. Incase you don't find whipping cream either, you can use the remaining egg whites (just ensure to whip it till its more that 3 times its volume and add in a little extra sugar)
Ladyfingers are sweet, spongecake-like biscuits, that are long and said to be shaped like fingers. Incase you don't find it, you can use basic vanilla sponge cake.


Tip: Mixing the coffee with any kind of liqueur gives this dessert a little oopmh and enhances the flavour. I've used Kahlua keeping with the coffee flavour of the tiramisu, but you can use dark rum, port, irish cream or brandy as well.


For portion control, you can also layer up in individual serving glasses. I've made a two layered dessert. Most restaurants serve a one layered version, but be generous to your family, more the layers, better the flavour.


Linguine with Broccoli Pesto


To the lay Indian, there are two types of pasta sauce- red and white. While I hate to sound snooty, I hate hearing the words 'red sauce/white sauce' even more. There are tons of pasta sauces out there: from the basic marinara (the so called red sauce) and bechamel (the white sauce), to puttanesca, caprese and carbonara. But going by the number of variations that I've written about, its no surprise that pesto is my favourite kind of sauce. Let me re-phrase that; home-made pesto is my favourite kind of pasta sauce. Once you make pesto at home, there is just no going back. I absolutely HATE store bought jarred stuff. And I hope someday you will too.


Note: My pesto in this recipe is really the star of the dish, so I haven't really added any additional meat or veggies. If you must add something to give your pasta dish some body, I'd recommend adding chicken, bacon or mushrooms.


Serves 4:

1 fistful of pasta ( I used Linguine)
Florets from 1 large Broccoli
1 cup basil leaves
1/2 cup pistachios
1/2 cup cheese
1 tsp lemon juice
2 tbsp olive oil
Salt & pepper to taste


Cook pasta till al dente. While the pasta is boiling, boil the broccoli florets in another pot as well. Once the broccoli is cooked through, drain (reserve a cup of the broccoli water) and transfer to a blender. Add in the rest of the ingredients (minus the pasta) and blend till the mix forms a sauce like consistency. Add the broccoli water if the mixture is too thick.


In a large bowl, add the pasta and the freshly made pesto. Toss till combined and you are done. Really, its that quick and simple!


Because the pesto is made from a vegetable, I haven't added anything else to my pasta dish (except some mushrooms as garnish). It may get too vegetable-y (if that's a word?!) if you add in some more greens.


Chicken, Spinach & Mushroom Risotto


 A good risotto for me trumps pasta any day. Its come to become one of my favourite italian dishes. I would also consider it a special occasion dish. It does need a lot of attention while cooking. Which is why I though it perfect to treat my mom to a fabulous risotto on Mothers day.

Risotto is a dish thats become associated with high end restaurants, but really its the epitome of italian home cooking. Every italian boy will tell you that his mama's risotto is the perfect comfort food. Its a one pan family meal that is so nutritious and packed with tons of flavour.


I chanced upon some affordable arborio rice in my recent trip to Goa. So my recipe today is as authentic as it gets. Ofcourse if you don't have arborio rice, you can use any starchy short grained rice. I've added chicken, spinach & mushrooms because that is what I had in hand. But really you can add any combination of veggies or meat. Its a perfect dish to use up leftover veggies or meat.


For a vegan version check out this recipe

Serves 4:

1 tbsp butter
4 cloves of garlic finely chopped
1/2 cup white wine
2 cups arborio rice (you can use any starchy short grained rice as a replacement)
1 litre chicken stock
1 cup chicken
1 cup mushrooms
2 cups spinach
Salt & pepper to taste
Parmesan cheese (optional)
4-5 basil leaves (optional)

In a heavy based pan, melt some butter. Add in the garlic and sauté till translucent. Add the rice and stir so the butter coats the rice thoroughly. Add in the white wine and simmer till it reduces.

Now the tricky bit. Use the chicken stock one ladle at a time. Add one ladle of stock in the rice and stir. The rice must completely absorb the broth before ladling another spoonful. Stir gently after each addition. About halfway through, add the mushrooms, spinach and chicken. Since these dont take too long to cook, we add them towards the end. Repeat the ladling step till all the broth is absorbed by the rice and its cooked. Once you start adding the broth the risotto usually takes 20-30mins to cook. Add in salt & pepper and your risotto is ready!


Traditionally a risotto is served with Parmigiano Reggiano, but enough with the fancy. I've served mine with regular cheddar cheese. Garnish with some basil or chives and serve with a glass of white wine.


Note: Italians like their rice al dente, which means the rice has a little bite. But I'm indian and I like my rice fluffy and well cooked. You can cook it to your preference.

Tip: You can also add some cream or milk towards the end of the cooking process. This makes the dish rich an creamy.


Vegan Coconut & Pesto Risotto


Risotto is an italian rice dish that is cooked in broth to a creamy consistency. To put it simply for the unaware indian, its the italian version of pulao. Traditionally, Arborio (an Italian short grain rice) is used to make risotto. It is extremely starchy and hence makes a creamy risotto. That said, I'm not gonna spend 500 bucks on a 250gm pack of Arborio. You can use other rice varieties, though long grained rice doesn't have as thick a starch coating as short or medium grained rice. Brown rice would also work but you'll need to cook it quite a bit longer, which means more stock.


For those of you who would raise an eyebrow for this recipe, mind you that risotto is more of a technique than a dish. Making it involves the slow addition of liquid and frequent stirring to coax the starch out of the rice. The basic steps of a risotto are making the soffrito, toasting the rice, and ladling in the broth. Once you get that right, the possibilities of flavours and texture combinations are endless. You can even play around with grains other than rice, like barley, oats or quinoa.


Serves 4:

1 cup rice
6 cups of vegetable stock
1/4 cup white wine
1 onion
4 cloves garlic
1 tbsp olive oil (or butter for a non-vegan version)
1 cup coconut milk
1 tbsp pesto
1 cup assorted veggies (I used mushrooms and broccoli)
Salt & pepper to taste
Lime to garnish

Sautee onions and garlic in olive oil over medium heat, until the onion turns translucent. Add the rice and stir the rice is evenly coated in oil. Once you can smell toasted rice, add the wine. Simmer till the wine is reduced and the pan is almost dry.

I made vegetable stock from scratch. If you are using a cube or powder, ensure you stir it in warm/hot water and dissolve. Add the stock one ladle at a time. Wait till the rice absorbs all the liquid before ladling another spoon of stock, and keep repeating the process. This step is essential in making a risotto, so dont rush this step. You want to use just enough broth to cook the rice and no more. About halfway through add in the coconut milk and pesto and stir.

Add in the veggies depending on how you like it. If you like it soft, add it when you are initially ladling the broth. If you like a bit of texture, add it one the rice is almost done. The risotto is ready once the rice is al dente and has the consistency of thick porridge. Season with salt, pepper and lime.

Serve immediately. The longer you let it stand, the more starches will set and you will end up losing its creaminess.


For a non vegan version, add a dollop of butter and a generous sprinkling of cheese


Chai Panacotta


Panna Cotta is an italian dessert of sweetened cream that is chilled and set with gelatin. The best way to describe it is also the worst way to describe it...it essentially a milk cream jelly...kinda like a cross between a pudding and custard. But the beauty of this dish is that its so incredibly easy to make. If it takes you more than 10mins to make, you are definitely doing something wrong.


Pannacotta is also very versatile. It gives a lot of leeway while cooking, and you can experiment infusing it with anything under the sun. Traditionally vanilla was infused...but that is so vanilla! Bad puns aside, I'm infusing mine with these fancy teas (early grey & english breakfast to be more specific) I got from a trip to London. You can obviously use regular tea bags. Also, how cute is the mug?!


Adapted from www.davidlebovitz.com

Makes enough for 4

1 cup fresh cream
1 cup milk
1/2 cup sugar
1 vanilla bean or 1 tsp vanilla essence
1 tbsp gelatin (see notes below on gelatin before using) 
2 tea bags (optional: If you don't like tea or just want to try making traditional pannacotta just skip the tea bags)


Heat the milk, cream and sugar in a saucepan. Ensure the heat is turned on low. Stir occasionally to ensure the sugar has dissolved. Once all ingredients are combined add in the vanilla extract. If using vanilla bean, cut the bean in half and scrape the seeds from (both sides of) the bean into the cream mix. The pod is also flavour, so toss the whole pod into the pan as well.

I used vanilla bean pod here and let me tell you, there is ABSOLUTELY no replacing it. The flavour you get with just one measly bean! An essence can never deliver the same flavour. So while it maybe expensive, for dishes like these I'd really recommend spending that extra 200 bucks. I got two beans in one tube. I used one for this dish and the other I mixed with my icing sugar bottle to make vanilla sugar. So there you go, it is definitely not a waste and definitely worth every penny.


I'm digressing! At this point add in the tea bags as well. Cover the pan and let it infuse on a low heat for 10 mins. The mixture shouldn't come to a boil. If you think it is going to start boiling, remove from heat and let it infuse on its own for 10 mins. Remove the tea bags and vanilla bean once infused. Taste to check if its yum. Pour gelatin into the hot pannacotta mix and stir till fully disolved.

Lightly oil cups or bowls with a neutral tasting oil (I used sunflower). Pour the mix in the cups and let them cool down to room temperature before chilling in the fridge. Chill overnight or until the gelatin sets.

Run a sharp knife around the edge of each panna cotta and unmold onto a serving plate. Serve as is or with summer berries.


Tip: If you are lazy like me or pressed for time, pour the panna cotta mixture into martini or wine glasses and chill so that you can serve them in the glasses without unmolding

P.S: I know you will say that my Panna Cotta looks 'dirty'. Those little polka dots are flecks of Vanilla beans and if u ask me, it looks prettier this way

Note: I have only used powdered gelatin so far, and to be honest I haven't found sheet gelatin anywhere in Mumbai

Sprinkle granules over the surface of cold water. I used 1 cup of water for 1tbsp of powdered gelatin. Do not dump them in water as the granules in the middle wont dissolve. Let it stand for 10 mins. Heat gently to ensure all granules are dissolved. It is now ready to be poured into the pannacotta mix.


Everyone needs a breakfast dessert. My breakfast cuppa has never been this good.

Spaghetti Carbonara


10 minutes. 5 ingredients. 2 bowls.

Crack eggs. Boil Pasta. Impress date.


If you don't know what a Carbonara is, all you need to know is that it involves life's 3 best ingredients: bacon, eggs & pasta. I'd like to tell you that its a really wholesome meal as it contains the main food groups: carbs (pasta), protein (eggs), fat (bacon) and maybe some dairy (cheese/cream) if you choose. And it is ridiculously simple to make. Its a classic Italian dish, which means a glass of wine is mandatory.


 Serves 4:

5 egg yolks & 1 whole egg
Bacon (who wants to put a measure on bacon? the more the better)
One fist full of Spaghetti (you can use any pasta, but spaghetti is best for this dish)
Salt & pepper to taste
1/2 cup cheese
2tbsp cream (optional)


Cut the bacon to bite sized pieces. Sauté on medium heat till the fat renders. Make sure you use a big utensil, like a casserole, for the bacon. This utensil is where the magic happens and will also double up as a serving bowl.

Meanwhile, cook pasta in a pot of boiling water till al dente. Remove bacon from heat when done, and let it cool (the bowl should be warm not pipping hot). Add egg yolks and egg to the bacon and whisk to blend.

Drain the pasta once done, reserving some of the pasta water. Immediately add pasta to the egg mix. Toss to coat. Add some of the pasta water incase you find the mix too sticky and thick. Work the pasta in batches. Add some pasta, toss, and then repeat till all the pasta is added. Add a lot of pepper (atleast 3tsp). Keep tossing till sauce thickens. Add salt.

Taste. The mixture shouldn't taste eggy. The principle is that the pipping hot pasta is enough to cook the egg. In case you find the egg taste too pronounce, add in some cream and put on a low heat for 5-7mins stirring occasionally.

Divide among bowls to serve or do what I do and have it straight out of the serving bowl :) Garnish with cheese.


Note: It may not look it, but this is a very heavy dish. Serve small portions.
In case you find the dish too bland (and I know most Indians would), grate some nutmeg, add some chilli flakes and basil.


Beetroot Gnocchi


I have a little treat for you guys today. Shrey Kamerkar, Sous Chef at Hyatt and my future husband, has been kind enough to guest blog for me.

He's created some simple gourmet dishes which will make your plate look spectacular, and your cooking skills seem 5star ready. I will be sharing his recipes in a 3 part series starting with this Gnocchi recipe.

For those of you who are wondering what on earth gnocchi (pronouced nyo-kki) is, it is a kind of pasta made from potatoes. In its essence, it is a boiled potato dumpling which you can serve with a variety of sauces.

Makes enough for 6 people

4 Potatoes (approx 250gms)
2 Beetroot
2 Egg yolks
1 cup Flour
1 cup Parmesan cheese (optional)
Salt & Pepper to taste

Fill a large pot with water & bring to boil. Peel & cut the potatoes & beet in half and add it to the water. Add in salt to taste. Bring to boil and cook till extremely tender (approx 40mins to an hour). Once done, scoop out the veggies with a slotted spoon. Save the water to recycle later.

From now on, you would have to work relatively quickly. Mash the veggies immediately. I used a masher and passed it on a sieve so that I got a really fine end product. Don't over mash, just aim for an even consistency with no noticeable lumps. Also, take a minute and admire the beautiful colour!


Now let this mash cool long enough so that its warm, but won't cook the egg when you add it. Get ready to get your hands dirty. Put the mashed veggies in a large flat surface. Make a 'well' in the centre. Add the egg yolk in this 'well'. Sprinkle the rest of the ingredients across the top. With your hands, mix to incorporate all ingredients until its like a sticky crumble. Now dust some flour on your hands and the flat surface, and knead to a dough. Add some flour if its too sticky. The final dough should be moist, not sticky.

Now I made rough 'tubes' out of the dough by rolling it on my palms. This is quick and easy if you aren't too fussy about shapes. But traditionally the dough is rolled to a snake like log and thumb sized pieces are cut using a knife. You can also shape the gnocchi with a fork (but seriously...who has time for such fancy work?).


Dust with some flour if needed, and add to boiling water. I reheated the potato & beetroot water and used it instead (more eco-friendly). If you are starting afresh, make sure your pot is salted. Cook the gnocchi in batches by dropping a handful at a time. You know they are ready when they pop to the top. Scoop them out with a slotted spoon a minute after they pop up. Ideally I would recommend making the sauce before hand and dropping these babies in the ready sauce. Since I was too lazy to have some sauce ready, I dropped them in cold water to stop them from cooking.


For the sauce:

100gms butter
2tbsp finely chopped Garlic
1 cup White Wine

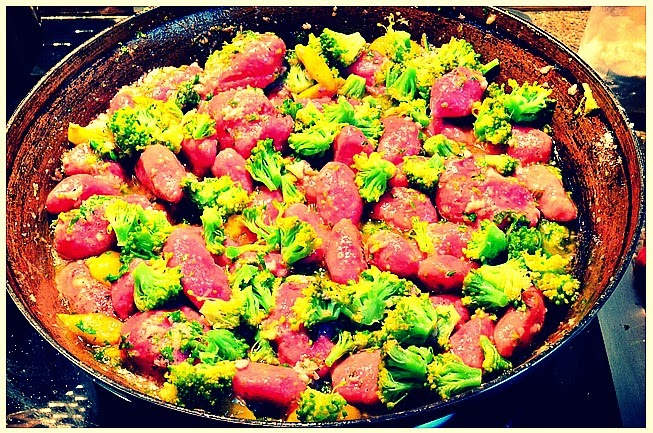
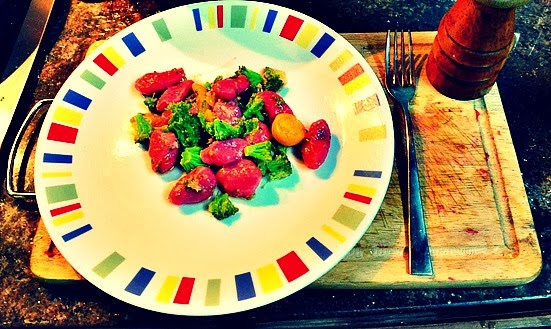
There is absolutely nothing better that gnocchi in some pesto. But since this isn't traditional gnocchi I'm going to make a simple yet delicious, butter garlic sauce. In a sauce pan, melt the butter and add in the garlic. Sauté for 2mins. Turn up the heat to high and add in the white wine. Swivel the pan to incorporate. Don't panic if it flames up. Now reduce the heat and add in the gnocchi. Toss in veggies if you like. I added broccoli, mushrooms and cherry tomatoes. Sauté for another minute or two. Serve immediately.


Such beautiful colours in one dish! Its almost too pretty to eat.


You can obviously add meat, but don't divert the attention of this dish from the gnocchi dumplings.