Search This Blog

Milk Cream

This Christmas sweet is always a winner. It's fudge like consistency and a biscotti flavour is a hit with everyone. And ofcourse, my mother-in-law makes it the best.

This melt in the mouth Milk Cream is a dream, but like all good things, it comes to those who wait and slog. It's tedious - make no mistake about that. This specific sweet demands a lot of elbow grease. Continuous stirring means that this recipe can get repetitive and monotonous, but wait till its done, you'll be grateful that you stuck it out till the end. It's amazing how with just 3 ingredients, one can whip up such delicious treats.


Recipe by Sandra Kamerkar:

1ltr milk
450gms sugar
100gms finely ground cashew nuts

On the lowest flame, bring the milk to boil (using a heavy bottomed non stick pan is the best). Keep stirring till the milk reduces to half it's quantity. This process usually takes atleast an hour. Add the sugar and keep stirring. The sugar will dissolve and the milk thickens further. Once the milk is thick i.e coats your spoon completely without falling like syrup, add the cashews. Keep cooking and stirring till the mixture thickens further and starts pulling away from the sides.


To test when its done, drop a bit in a cold water bowl. The mixture shouldn't separate/dissolve in water, and it should hold together i.e: you should be able to make a ball and it should be smooth and hold its shape. Alternately, you can stick your finger in the pan and the mixture shouldn't be sticky.

Take off the heat and remove in a bowl to cool and dry. Once cool, butter rubber moulds and mould the milk cream. If you don't have moulds, you can roll them into little balls. Or using an oiled rolling pin, roll it out and cut into squares.


Place on a tray and let it dry overnight. Store in an airtight container.

Note: I cannot stress the importance of stirring the mix continuously, failing to do so will burn the mixture. Do not take you eyes (or your spoon) off the mixture.


Once ready, the milk cream actually turns colour from white to off white or biscuity.


Fudgey Walnut Toffee


The next few recipes come from my mother-in-law Sandra Kamerkar. She is a treasure trove of recipes and I'd be a fool to not share her cooking on the blog. I asked her to show me some traditional christmas sweets and this is the first thing she made. It's pretty easy to make, which is why its perfect for those trying out xmas sweets for the first time.

You only need 4 commonplace ingredients. The crunchy, fudgey texture is just a party in your mouth. And its so addictive! I can eat these like pop corn.  It's bite sized which makes a perfect edible gifting option.


1 can condensed milk*
1/2 tin sugar
1/2 tin full fat milk
1 tin chopped walnut
2tbsp cocoa powder

*I've used the empty condensed milk tin as a measure for the rest of the ingredients


Mix all ingredients (except the walnuts) in a pan on a low flame. Keep stirring gently till the mixture leaves the side of the pan. Now add the walnuts and stir to incorporate. Let it cool enough that you can touch it without burning your hands. Once it's manageable, roll into bite sized balls. The mixture needs to be shaped while still hot. Once it cools down it gets rock solid and completely unmanageable. Wrap in chocolate wrappers if you desire to gift.


Tip: You can add additional flavouring (like coffee) to the milk mixture to give this toffee some zing.


Peach Ice Tea Mojito


With so much Christmas prep happening, I need refreshing drinks at one arm's distance. This drink is summer in a glass. It's like an adult Glucon-D! So refreshing! It's a perfect drink to serve for brunch or barbecues. The bigger the batch, the yummier the drink.


Makes 1ltr

100ml peach tea syrup*
1tbsp Sugar
1 cucumber
10-12 basil leaves
Cold water
Ice (optional)

*Monin usually makes amazing syrups. Incase you don't have this you can use Lipton instant peach ice tea powder as well

In a tumbler, muddle sugar, basil & the peach tea syrup. Add water to dilute and fill the tumbler and stir till sugar is dissolved. Finely slice the cucumber and add. Add ice et viola!


P.S: This recipe is for a mocktail, but you can easily add vodka, rum or gin.


Focaccia Bread


I first tried focaccia bread at Theobroma. This was at a time when I didn't even know how to pronounce focaccia (it's foe-kat-cha fyi). And it was love at first bite. I always buy some focaccia to bring back home. My family relishes it. It's such a rustic bread and topped with such delicious things that it's like eating a pizza. Basic focaccia dough requires just 5 ingredients - olive oil, flour, water, yeast and salt. The beauty of this dough is in its simplicity, which is why it lends itself to so many variations. Once you have mastered the dough, your toppings are endless. And it's the perfect option for novice bread makers as its easy to prepare and doesn't require any fancy kneading or shaping techniques.


For my focaccia, I've  divided the dough to make two loaves - one with garlic, rosemary, thyme and oregano; and another with garlic and olives.


Adapted from The Joy Of Cooking

1 1/3 cups of warm water
2 1/4 tsp of active yeast (if using dry yeast double the quantity)
3 1/2 cups of all purpose flour
Olive oil*
2 tsp salt

*I estimate atleast 2 cups of olive oil. This dough uses a lot of olive oil as you will read below, so really use your own instinct while using olive oil, more the better!

Suggested toppings:
Dried herbs like Thyme, oregano, rosemary, basil or dill
Olives
Tomatoes
Onions
Cheese


Combine the warm water and yeast in a large bowl and let it stand for 5 odd minutes until the yeast is dissolved.

Add the rest of the ingredients (approx 2 tablespoons of the olive oil right now), minus the toppings, and mix for a minute. Now knead for 7-10mins until the dough has come together and is smooth and elastic. Transfer the dough to a bowl lightly coated with olive oil and turn it so as to even coat the dough with oil.

Cover with cling film and keep in a warm place for 60-90mins to let it rise. Pssst....this dough is actually now a pizza dough. You can actually punch down the dough, let it rest and then add your favourite toppings to make pizza. I'm digressing...pizzas is for another day and a different blog post.

After the first rise, divide the dough in half and roll each piece out to a 1/2 inch thick round (this isn't necessary, I did it as I was making two variations). Transfer to well olive oiled baking pans. Cover with oiled plastic wrap for 1 1/2 hours to let it rise again.

Preheat the oven to 200 degrees celsius. Remove the cling wrap before baking. Press the dough with your fingertips to make indentations all over. While this step includes getting your hands dirty, don't skip it. Not only does it make the bread look good, dotting the bread creates multiple wells which help preserve moisture in the bread. Drizzle 1/2 cup of olive oil over the dough and add your desired toppings.

Bake for approx 25 mins or until the bread is golden brown. Serve warm as is or as sandwich bread at room temperature.


The trick to making good focaccia is to ensure you create a lot of dimples into the dough with your fingertips. And then drizzle enough olive oil into those dimples. These crevices absorb the oil while the focaccia bakes creating a bread with a beautiful crust with a tender interior (see below).


Cinnamon Rolls & more

Sugar. Spice. And everything nice. These were the ingredients chosen to create the perfect little roll. My kitchen this week was transformed into the best smelling place on earth. Imagine the smell of warm freshly baked bread, fresh ground cinnamon and melting butter - it's probably what the evil witch used to lure Hansel and Gretel. Yep, sweet dreams are made of these.

And they taste as good as they smell. I'm guessing most people don't attempt making these at home thinking that they are just too much work and too time consuming. Well, think again. This dough is as easy to make as cake batter. Actually, minus the yeast, it practically is cake batter - flour, sugar, milk, butter, eggs.

I truly believed I had self control until I made these. It is just too irresistible and hence perfect to serve for breakfast on Christmas day. Just wait till you smell them baking,  it's probably what Santa's factory smells of. I want to bottle this scent and wear it forever!


Adapted from Epicurious.com

For the dough:

1 cup milk
3 tbsp unsalted butter
3 1/2 cups (plus more for rolling and dusting) all purpose flour
1/2 cup sugar
1 large egg
3tsp active dry yeast (if using the powder form double this quantity)
A pinch of salt

For the filling:

3/4 cup brown sugar
2 tbsp ground cinnamon
1/4 cup melted butter

For the glaze:

1 cup cream cheese
1tbsp milk or fresh cream
2 cup powdered sugar
1/4 cup melted butter
1 tsp vanilla essence
2 tbsp Amarula or any other liquor (optional)

Combine milk and butter in a bowl and microwave until the butter melts. The mixture should be warm and not piping hot. Pour into a large bowl. Add 1 cup flour, sugar, egg yeast and salt. Using your hands or a stand mixer stir to combine. Add the rest of the flour and mix till the flour is incorporated. The dough should be sticky but should also pull away from the sides of the bowl.

Lightly flour your kitchen work surface. Turn the dough out and knead until smooth and elastic. Add some more flour if the dough is too sticky. After kneading for about 5-8mins the dough should come together to form a smooth ball. Lightly oil a large bowl and transfer the dough, turning it to coat. Cover the bowl with cling film or a kitchen towel. Let it rise for approx 2 hours or until the dough is double in volume.

Punch down the dough gently with your knuckles. Transfer again to floured work surface. Roll the dough out to form a large rectangle. You can also cut out the dough to give the desired shape.


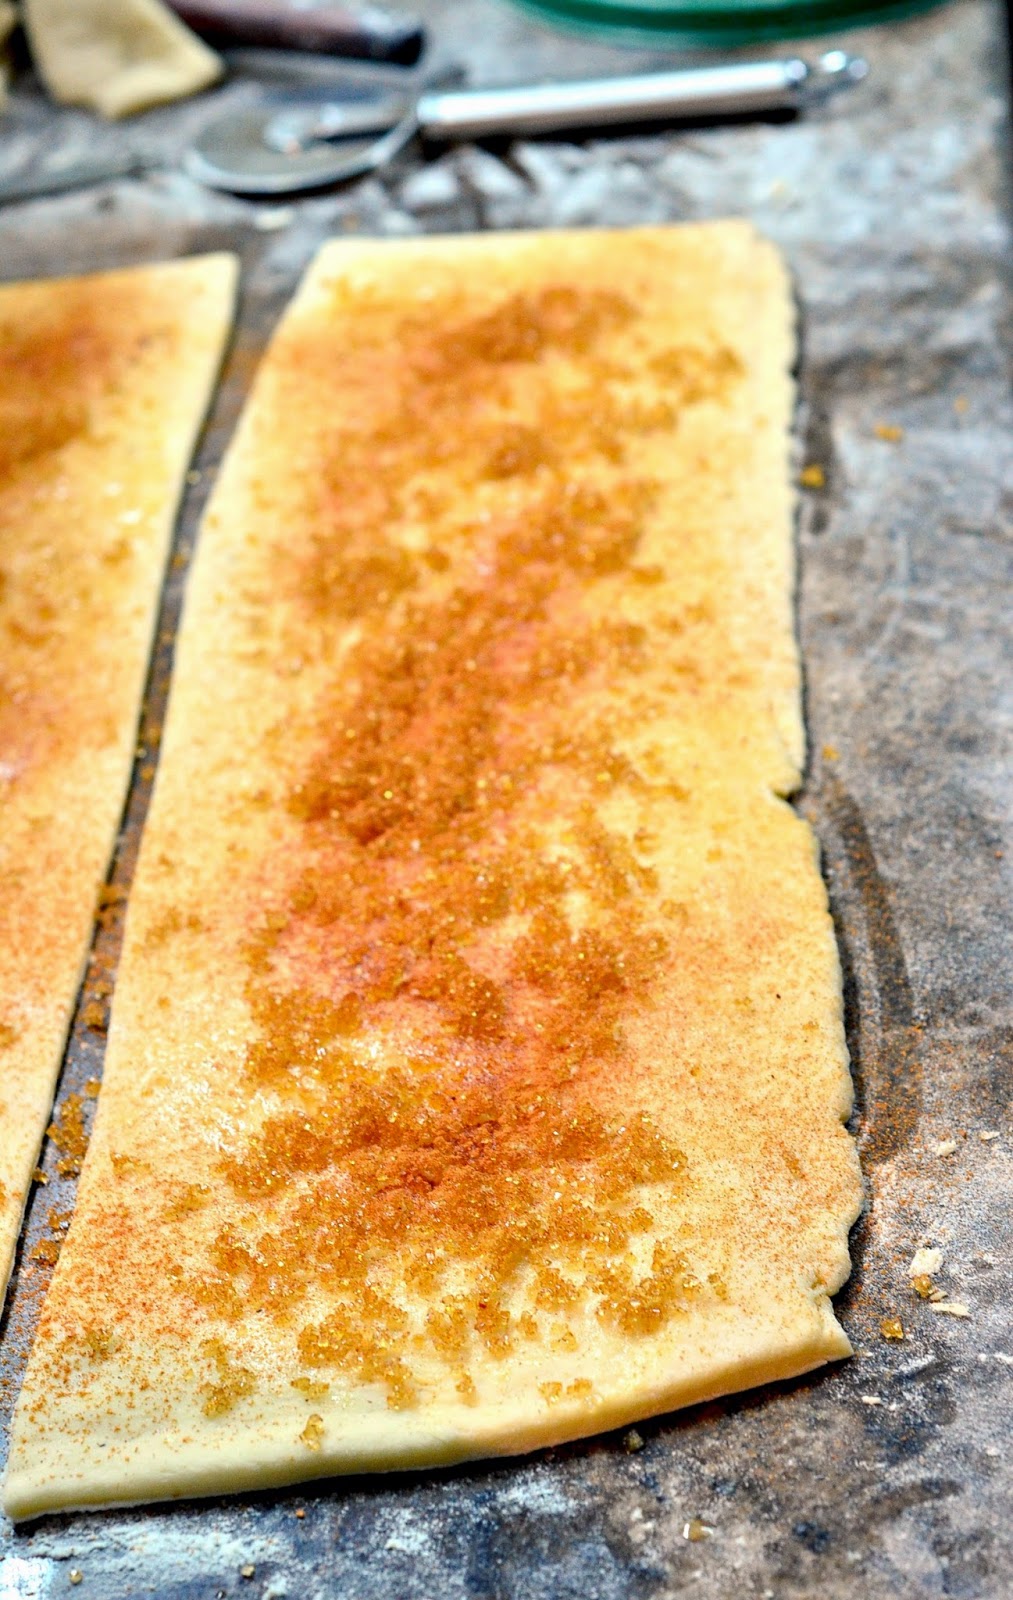
Now for the filling: spread butter over the dough. Mix brown sugar and cinnamon in a bowl. Sprinkle this cinnamon sugar evenly over the butter. Ensure that you leave 1/2 inch border. Roll the dough into a log. You can pinch it gently to keep it rolled up. with seam side down, cut the dough into 1/2inch to 1inch sized slices.


Grease your baking dish and arrange rolls cut side up. It is ok if there is barely any space between rolls. Cover the baking dish with cling film or a kitchen towel and let the dough rise again for 4-50mins.


Preheat the oven to 200°C. Bake rolls for approx 20 mins or until the tops are golden.


Remove from the oven and invert immediately onto a rack to cool. Once cooled, turn the rolls right side up.


For the glaze, beat all ingredients together until smooth. Drizzle on top of the rolls. Serve warm or at room temperature.


The best part is that I had a lot of trimmings left by cutting the dough to a rectangle. So I got to experiment with different fillings. Pictured here is a giant roll stuffed with some cherry jam that I had in my pantry.


Besides the classic cinnamon filling, I recommend trying chocolate chips, dessicated coconut, nuts, caramel or even fresh fruits.


FYI: Butter, eggs, milk and sugar slow down yeast activity. Regular bread rises quickly but since this roll involves all of the above, the bread may rise more slowly or not quite as much as usual. There is nothing wrong with the yeast or the bread, it's just that for recipes as rich as these, you just need patience :)


Eggs Benedict


How do you like your eggs?

If you have ever seen 'Runaway Bride' (and I'm sure you have, Richard Gere and Julia Roberts are almost impossible to resist), you must be familiar with Eggs Benedict. Not only is it Maggie Carpenter's (Julia Roberts) favourite way to eat eggs, it's also probably the most indulgent way to eat an egg. Picture this, crispy ham on a buttery toasted muffin...silky, poached egg slathered with a thick and luscious hollandaise sauce...drooling yet? Eggs Benedict is a breakfast classic and a perfect way to begin an indulgent day. For its pure decadence, I include this in my Christmas cooklist


Eggs Benedict has so many components, so much technique, that it can make it's way to a Masterchef Pressure Test. And because its full of so many moving parts, I'd almost never endeavour to make at home. I would file this dish right under Pavlova and Macaron in the list of things I'd rather leave to professional chefs. Which is why this dish is put together by Shrey.


Serves 1:

For the Hollandaise:

2 egg yolks
1tbsp lemon juice or vinegar
1/2cup butter
Salt and pepper to taste

For the Eggs Benedict:

2 rashes of bacon or ham
1 English muffin cut in half. I used a bagel instead. You can really use any type of bread
2 tsp white vinegar
2 eggs
Salt and pepper to taste
Hollandaise sauce
Parsley to garnish (optional)

Make the hollandaise sauce first:

Melt the butter in the microwave. In a bowl, beat together the rest of the ingredients. Next combine the melted butter with the eggs slowly and a little at a time (you'll probably need a little help at this stage). If you add the whole batch of melted butter, the eggs will curdle and you'll end up with a chunky sauce. Instead, slowly drizzle the melted butter in a thin stream, whisking the eggs the entire time. This technique is emulsification. You are looking for a smooth creamy sauce probably as thick as mayonnaise.


Cut the bagel in half and toast. Crisp up some bacon or ham in an oven or in a hot pan.

To poach eggs:

Half fill a non stick skillet with water. Add the vinegar and bring to a simmer. Break the eggs into two separate ramekins or bowls, taking care to not break the yolks. Gently tilt the bowl and let the egg slide out into the water. Repeat with the other egg as well. Reduce the heat to a gentle simmer

Cook for 2-3mins or until the egg white has set and the yolk remains soft. Remove with a slotted spoon.

Note: The vinegar is used to help coagulate the egg and helps it set faster. If you are tasting vinegar in the egg, then you've added too much


To assemble:

Lay the bacon slice on top of the bottom half of the bagel. I skipped using the meat completely as this dish is already pretty heavy. Gently place the poached eggs on top of the bacon. Season with salt and pepper. Spoon the hollandaise sauce over the eggs. Sprinkle some chopped parsley on top and enjoy!


Tip: Instead of hand whisking the hollandaise, put it in the blender.

To the eggs benedict hesitant: you can do it! The key is to prep everything before you start. Do your bacon in the oven, eggs on the stove, bread in the toaster and hollandaise in the blender. It's like conducting an orchestra, so many parts which come together so deliciously, its like music to your ears.

P.S: I like my eggs scrambled but I'm warming up to eggs benedict